Autoscaling with Terraform: A Guide to Efficient Infrastructure Management
Understanding Scaling
Scaling is the process of adding or removing resources to match the changing demands of your application. As your application grows, you will need to add more resources to handle the increased load. And as the load decreases, you can remove the extra resources to save costs.
Terraform makes it easy to scale your infrastructure by providing a declarative way to define your resources. You can define the number of resources you need and Terraform will automatically create or destroy the resources as needed.
What is Auto Scaling?
Auto Scaling is a cloud computing feature that allows you to automatically adjust the number of compute resources in your application based on predefined conditions. This ensures that your application can handle varying loads efficiently while also optimizing resource utilization and cost. In the context of AWS, Auto Scaling Groups (ASGs) provide the capability to automatically scale resources, such as EC2 instances, in and out as needed.
The Benefits of Auto Scaling
Improved Availability: Auto Scaling ensures that your application can handle increased demand without downtime. If an instance fails, the ASG automatically replaces it, maintaining a consistent level of service.
Cost Optimization: Auto Scaling can save you money by scaling in during periods of lower demand and scaling out during peak times. You pay only for the resources you actually use.
Operational Simplicity: It reduces the manual effort required to manage the number of instances, making it easier to handle variations in traffic.
Implementing Auto Scaling with Terraform
Step 1 - Crafting an AWS Provider Configuration
In Terraform, the provider.tf file, also known as the provider configuration file, is used to define and configure the providers you plan to use in your Terraform project. Providers are responsible for interacting with various cloud or service APIs, such as AWS, Azure, Google Cloud, or other data sources like GitHub or external databases.
Here is a basic configurationof what a provider.tf file might look like:
provider "aws" {
  region  = "us-west-1" # You can change this to your preferred region
}
Step 2 - Specifying Terraform and AWS Provider Versions
To specify the Terraform and AWS provider versions in your Terraform project, you can use a versions.tf file to pin the required versions of Terraform itself and the AWS provider. This helps ensure that your infrastructure code remains compatible with the desired versions of Terraform and its providers.
Here's versions.tf file look like:
terraform {
  required_providers {
    aws = {
      source  = "hashicorp/aws"
      version = "~> 4.16"
    }
  }
  required_version = ">=1.2.0"
}
After creating the versions.tf file with the desired Terraform and provider versions, you can run terraform init to initialize your project. Terraform will download and configure the specified versions of Terraform and the AWS provider.
Step 3 -Constructing a Virtual Private Cloud (VPC)
To establish a Virtual Private Cloud (VPC) with a CIDR block of 10.0.0.0/16, fabricate a file named vpc.tf and embed the ensuing code:
#Create VPC
 resource "aws_vpc" "my-vpc" {
   cidr_block = "10.0.0.0/16"
   tags = {
     Name = "my-vpc-terraform"
   }
 }

Step 3 - Create a public subnet with CIDR block 10.0.1.0/24 in the above VPC.
Create another file named subnet.tf to create public subnets within the VPC.
resource "aws_subnet" "public_subnet_1" {
  vpc_id     = aws_vpc.my-vpc.id
  cidr_block = "10.0.1.0/24"

  tags = {
    Name = "public-subnet-1"
  }
}

resource "aws_subnet" "public_subnet_2" {
  vpc_id     = aws_vpc.my-vpc.id
  cidr_block = "10.0.2.0/24"

  tags = {
    Name = "public-subnet-2"
  }
}
Here, vpc_id points to the VPC we created earlier. The map_public_ip_on_launch = true attribute ensures that any EC2 instance launched in this subnet will automatically receive a public IP.

Step 4 - Create an Internet Gateway (IGW) and attach it to the VPC.
Let's add an Internet Gateway (IGW) and associate it with that VPC using Terraform.
To enable your VPC to connect to the Internet, it's necessary to create an Internet Gateway (IGW). Create a file named igw.tf and below code:
resource "aws_internet_gateway" "my-igw" {
  vpc_id     = aws_vpc.my-vpc.id #refrence to VPC created already

   tags = {
     Name = "my-igw"
   }
 }
In this configuration:
The
aws_internet_gatewayresource creates the Internet Gateway.The
vpc_idattribute inaws_internet_gatewayrefers to the ID of the previously created VPC, establishing the link between the VPC and the IGW.
This code sets up an Internet Gateway for your VPC.

Step 5 - Create a route table for the public subnet and associate it with the public subnet. This route table should have a route to the Internet Gateway.
Creating a route table for a public subnet and associating it with an Internet Gateway is a common practice for setting up AWS VPCs with Terraform. Create a file named route_table.tf and below code:
Route Table for Public Subnet:
resource "aws_route_table" "public-route-table" {
  vpc_id     = aws_vpc.my-vpc.id  #refrence to VPC created already

   route {
     cidr_block = "0.0.0.0/0"
     gateway_id = aws_internet_gateway.my-igw.id
   }

   tags = {
     Name = "public-route-table"
   }
 }
Associate the Route Table with the Public Subnet: route_table.tf continued..
resource "aws_route_table_association" "public_subnet_association_1a" {
  subnet_id      = aws_subnet.public_subnet_1.id
  route_table_id = aws_route_table.public-route-table.id
}

resource "aws_route_table_association" "public_subnet_association_1b" {
  subnet_id      = aws_subnet.public_subnet_2.id
  route_table_id = aws_route_table.public-route-table.id
}
This code delineates a route table for the public subnets and establishes associations to enable internet connectivity.
Step 6 - Creating a Security Group
For our EC2 instances, we necessitate a security group to manage inbound and outbound traffic. Generate a file named security_group.tf and inject the ensuing code:
resource "aws_security_group" "allow-ssh" {
  name        = "allow-ssh"
  description = "Allow SSH inbound traffic"
  vpc_id     = aws_vpc.my-vpc.id  #refrence to VPC created already

ingress {
    description = "Access Website"
    from_port   = 80
    to_port     = 80
    protocol    = "tcp"
    cidr_blocks = ["0.0.0.0/0"]
  }

  ingress {
    from_port   = 22
    to_port     = 22
    protocol    = "tcp"
    cidr_blocks = ["0.0.0.0/0"]
  }

  egress {
    from_port   = 0
    to_port     = 0
    protocol    = "-1"
    cidr_blocks = ["0.0.0.0/0"]
  }
}
This code establishes a security group for our EC2 instances, granting permission for HTTP (port 80) and SSH (port 22) traffic.
Step 7 - Crafting an Auto Scaling Group
Auto Scaling Groups are used to automatically add or remove EC2 instances based on the current demand. Follow these steps to create an Auto Scaling Group:
Create autoscaling.tf file, add the following code to create an Auto Scaling Group:
resource "aws_launch_configuration" "web_server_launch" {
  name                        = "web_server_launch"
  image_id                    = "ami-053b0d53c279acc90"
  instance_type               = "t2.micro"
  security_groups             = [aws_security_group.allow-ssh.id]
  associate_public_ip_address = true
#Add UserData to install apache server to host your website
  user_data = <<-EOF
            #!/bin/bash
            sudo apt-get update -y
            sudo apt-get install -y apache2
            sudo systemctl start apache2
            sudo systemctl enable apache2
            echo ""<header> <h1> Hello World! Welcome to <a href="https://kshitijaa.hashnode.dev/" target="_blank"> Kshitija-Bartakke-Malwade-Blogs! </h1> </header>"" > var/www/html/index.html
  EOF
}

resource "aws_autoscaling_group" "web_server_asg1" {
  name                 = "web_server-asg"
  launch_configuration = aws_launch_configuration.web_server_launch.name
  min_size             = 1
  max_size             = 3
  desired_capacity     = 2
  health_check_type    = "EC2"
  vpc_zone_identifier = [
    aws_subnet.public_subnet_1.id, aws_subnet.public_subnet_2.id
  ]
}
This code constructs an Auto Scaling Group that automatically fine-tunes the number of EC2 instances based on demand. It leverages the launch configuration defined earlier.
Applying Terraform
Having articulated your infrastructure and scaling components, the next step is to initialize and apply your Terraform configuration.
In your terminal, execute the following commands:
terraform init
terraform plan
terraform apply
These commands will kickstart Terraform and apply the configuration, thereby creating the designated resources on AWS.
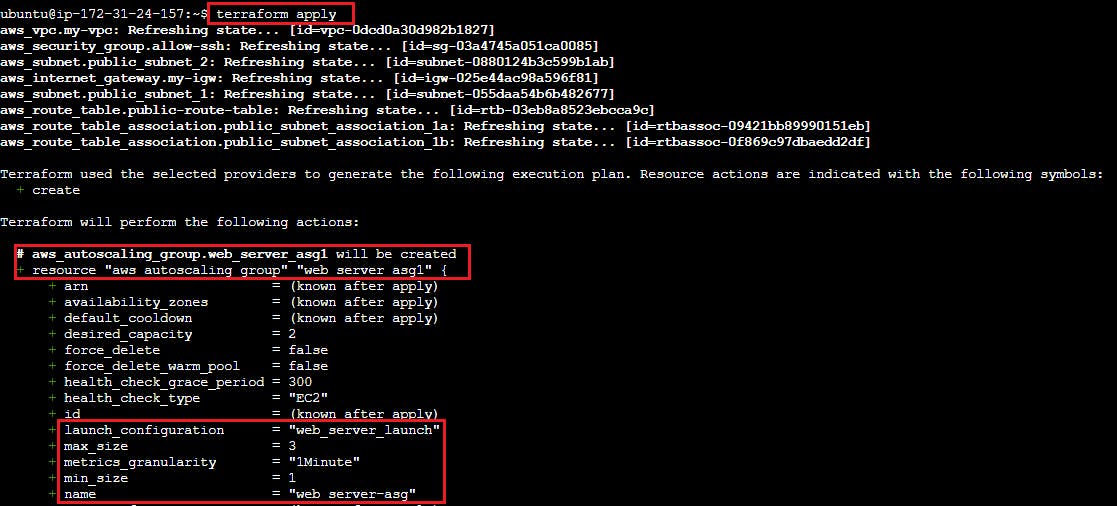
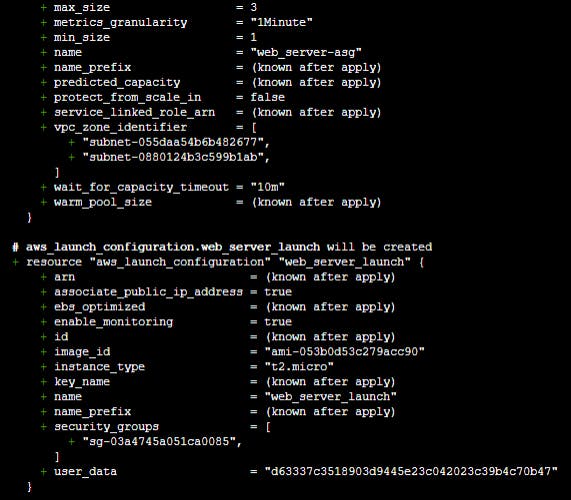
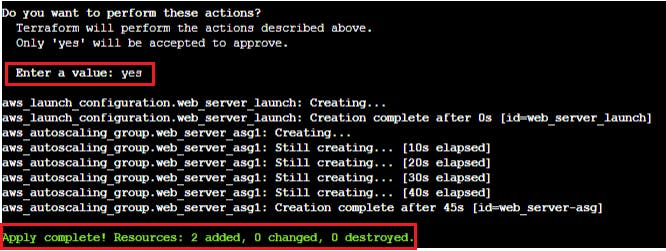
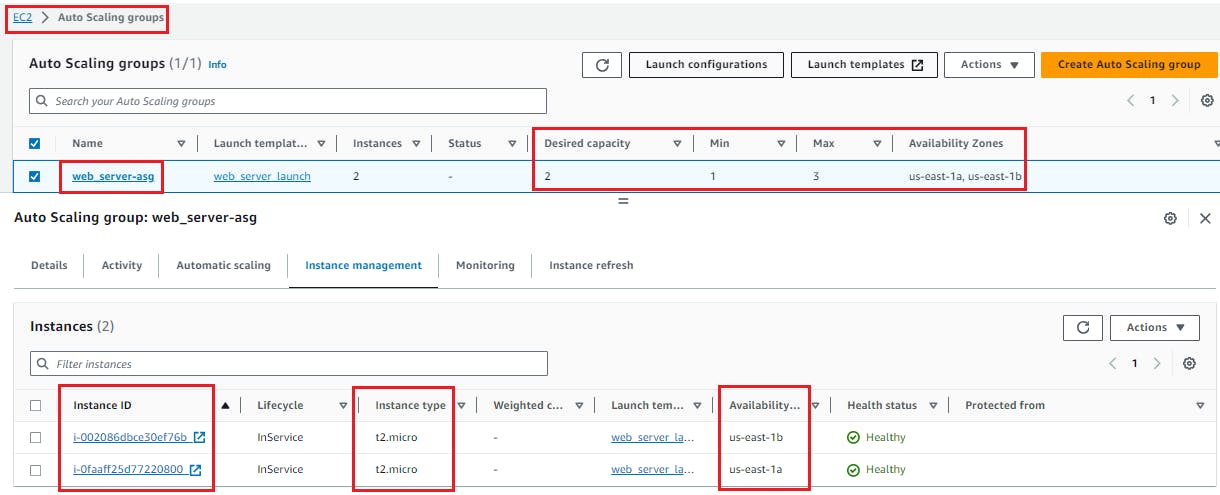
On AWS Console it look like below
Testing Scaling
Now that your infrastructure is in place, it's time to evaluate the scalability.
Task 1: Creating an Auto-Scaling Group
Verify the desired capacity of the Auto Scaling Group by navigating to the AWS Management Console.

Task 2: Testing Scaling
In the AWS Management Console, access the Auto Scaling Groups service.
Opt for the Auto Scaling Group you created and click on the "Edit" button.

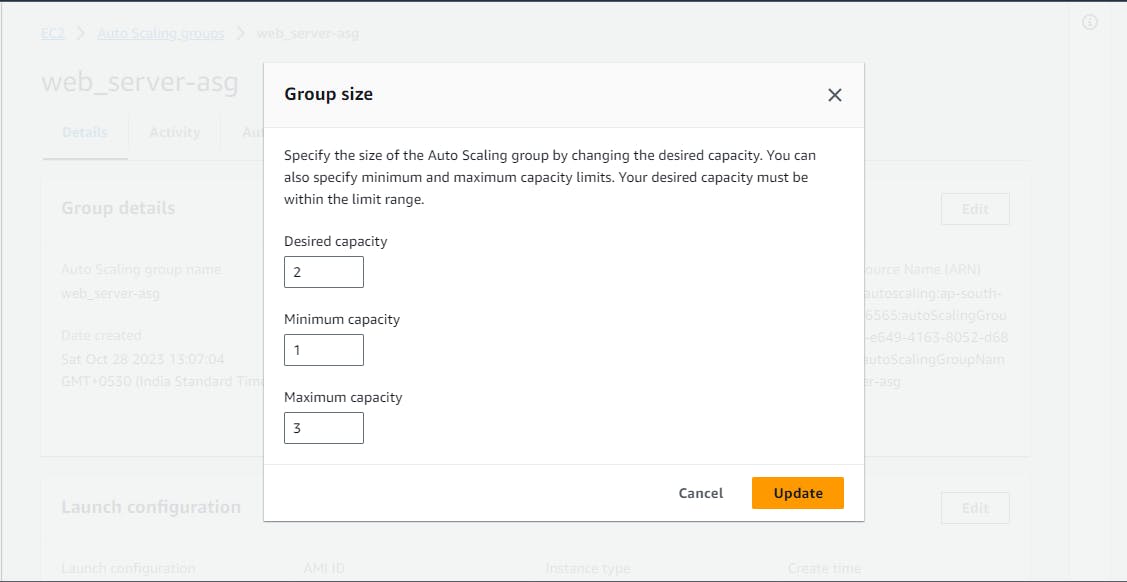
Enhance the "Desired Capacity" to 3 and save your changes.
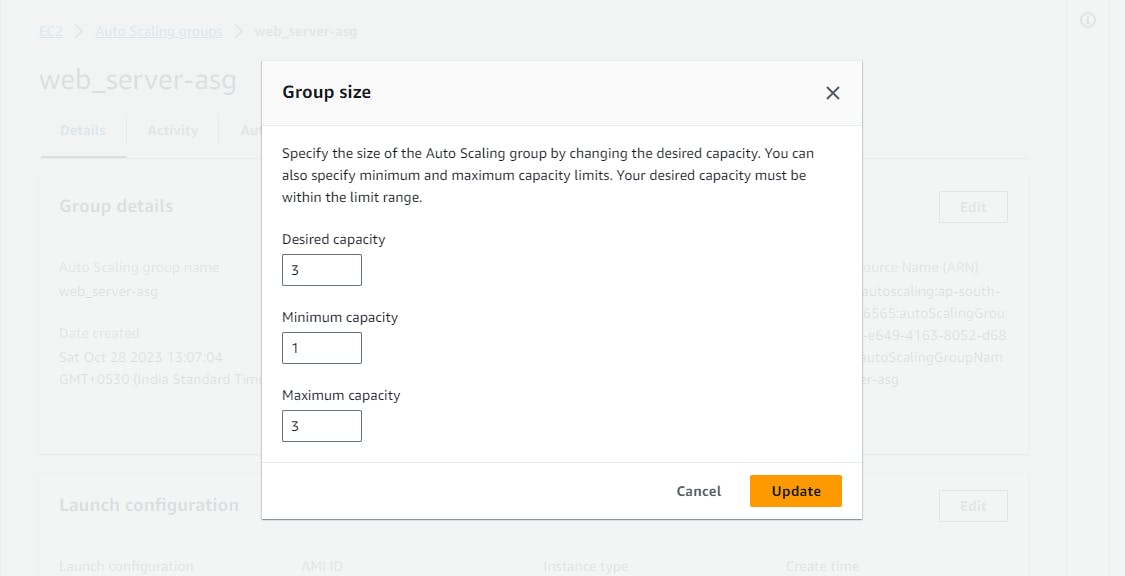

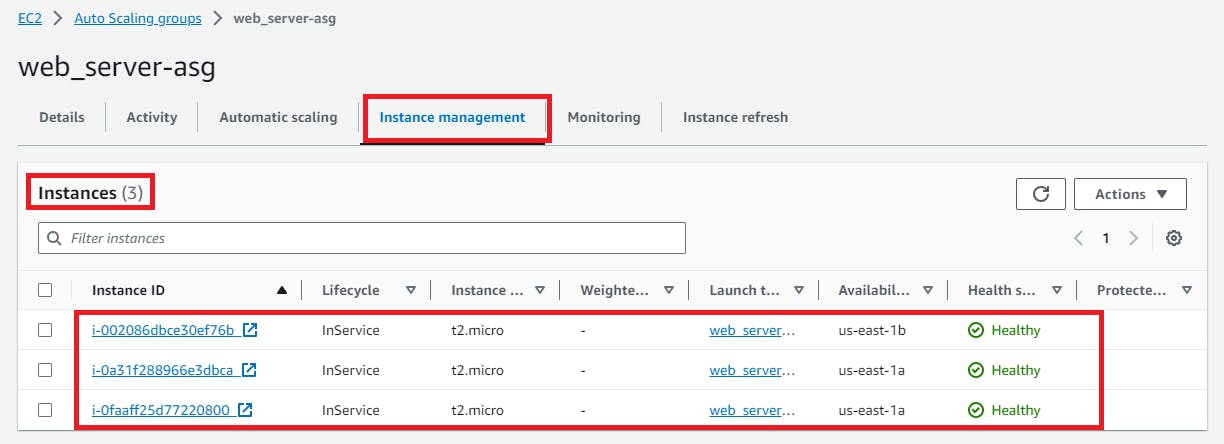
Now, click on Instance management and you will see 3 instances are running as per desired capacity
Reduce the "Desired Capacity" to 1 and wait for the excess instances to be terminated.
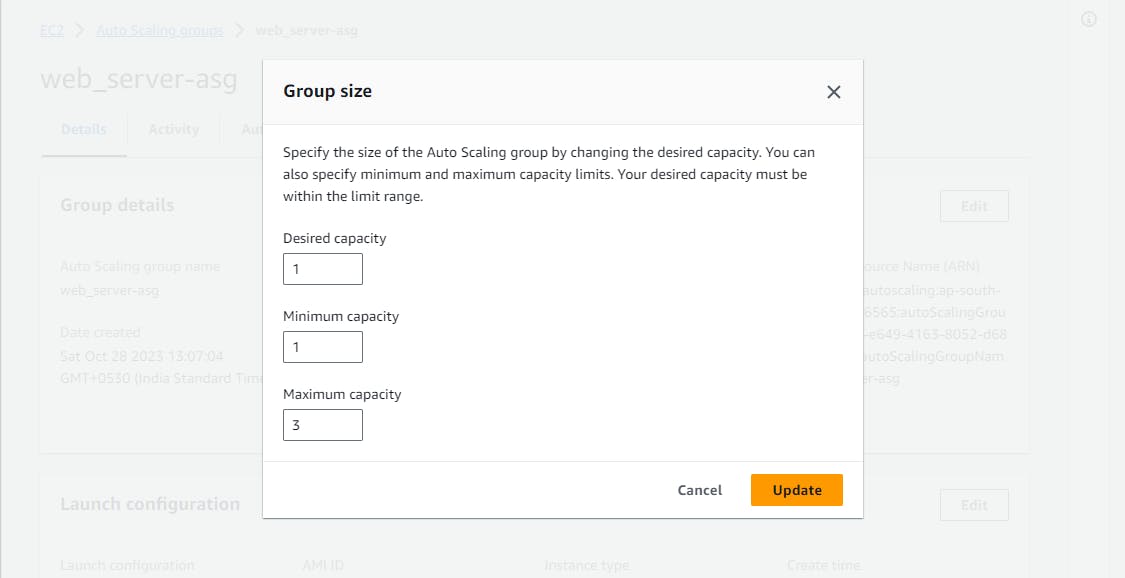
Visit the EC2 Instances service and confirm the termination of the surplus instances.


